Tuesday, June 26, 2012

Disney Cruise Crafts Finale


The count down to our Disney Cruise is at 10 days! We are so excited! Chris and I have been looking into cruise excursions and making reservations for activities on and off the boat. One of the activities on the boat is a night with the theme of "Pirate in the Caribbean." It is a deck party and people come dressed up, so keeping with the spirit of the cruise I have been trying to find Chris and I something fun to wear. The other day at Target I found these pirate accessories in their dollar section. 


Searching my costume box I found that I had an unopened pirate shirt, perfect for Chris to wear! (Excuse the wrinkles) This gave Chris the perfect excuse to buy the linen pants he has been wanting for a while! I must say he is going to make one dashing pirate!


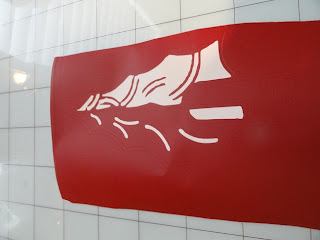
After shopping costume stores and looking online, I wasn't interested in any of the women pirate outfits, so naturally I decided I would make my own. I found this shirt in the kids section at Kohl's and created the outline using an image I found online. I didn't take pictures of the process, but I used the Smooth Red Silhouette Heat Transfer material for the design. When using the heat transfer during my first attempt, I didn't put anything between the plastic and the iron, thus melting the plastic transfer sheet before the design stuck. For attempt two I used a paper towel between the iron and the transfer, and it worked great! I didn't use a template for rhinestones this time, instead I used the Silhouette Pick Me Up Tool to place black rhinestones in the cut out section of the eye piece. I reused the plastic that came off the heat transfer and ironed the rhinestones onto my shirt. I found a large belt on clearance and a black skirt I cut up to complete the outfit! 


For my last Disney Cruise project I wanted to make Chris something "Disney" to wear, but he is not the type of guy to wear a Mickey branded across his chest. I decided to subtly hide the logo on the side of his shirt and wrap it from front to back. I did not want to use the heat transfer materials this time because most shirts of this style don't look screen printed, instead I went with the Silhouette Fabric Ink.


I used the red and cyan colors, and I didn't mix them. There is a color wheel in the Fabric Ink Idea Book that tells you how to mix the primary colors to get a desired color. Maybe next time I will do a creative color, but this time I went with the easy route. I used the same logo I have used for the count down in the top picture and the Disney Cruise Rhinestone Shirt I made in previous posts. The fabric ink recommends that you use a transfer stencil vinyl, but it is only nine inches. I cut it once, but I realized I wanted a larger design. The grey is the fabric stencil vinyl and the navy is regular 12 inch vinyl. 


Using the Silhouette Studio I first tried to stretch the logo and change the dimensions to 12 in. by 30 in., you can do this on the right hand side of the screen as shown below.  The Silhouette says it can cut an image 12 in. by 10 ft., so I thought this should work. After loading the vinyl the rollers started pulling more from one end, resulting in vinyl being bunched up on one side and the blade still cutting. (I didn't figure out until later that this was most likely because the starting line of the vinyl was not evenly cut, and probably had nothing to do with the design.)


When that attempt failed I decided to stick with what I knew would work and went back to a 12 in. by 12 in. design. I kept the same dimensions for the logo, but cut it in half. I used the cut line tool, as shown by the arrows, to cut my image in half. I sent one page through the cutting process, then rotated the design and did the same for the other half.


After the cuts were made I weeded each sheet and matched them up on the shirt (**before starting this process I washed and ironed the shirt). When using fabric ink you keep the outline of the image for the stencil and weed the center. Unfortunately for the process I chose I am left with two half logos...not sure what I can use these for, but I saved them.


I matched the logos up along the side seem of the shirt (I figured an arm would cover any mistakes I made along this line). I painted the front first, used a hair dryer to speed up the drying process, then flipped the shirt over to paint the side seem and back. Once both sides were done and dry I peeled off the vinyl and ironed the paint to seal it in to the shirt. Hopefully Chris will like this shirt as much as I do!


Front
Back

Thursday, June 21, 2012

Father's Day, Glass Etching, & More!

This past weekend I travelled down to St. Pete Beach, FL for a girls weekend, but before the trip I was crafting as usual. Here is a quick catch up.... My friend Brooke (who inspired me to start a blog) requested vinyl name stickers so she could make these fun boxes to store her boys' art in files as they grew up. I gave Brooke the decals and she placed them on the bins and sent me this picture! Didn't they turn out great?


 I recently experimented with the heat transfer and fabric paint options that the Silhouette has to offer. The heat transfer shirt came out awesome, now I'm just waiting to see how it washes. No pictures of those projects yet, but I will post soon.

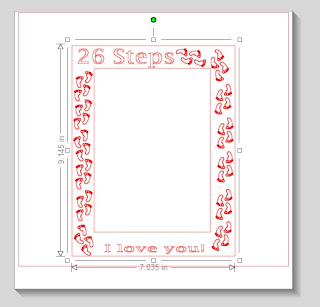
Father's Day was also this past weekend I wanted to do something special for my dad. On my birthday my dad wrote me an amazing letter that reflected on his experience walking me down the aisle, as well as noting other important steps he watched me take as a father. In the letter he said it was 26 steps down the aisle to the altar before he gave me away to Chris. I was in tears immediately and even thinking of the letter makes my eyes go watery. I had the idea to try my new toy's ability to do glass etching. My goal was to find an all glass frame and etch "26 steps" with 26 pairs of feet around the edges that included a picture of my dad walking me down the aisle. This is what I created in the Silhouette Design Program...


I started by creating two boxes the exact size of the frame so I was using real dimensions as I made the design. **In case you are using a Silhouette you can create a square by holding down Ctrl and selecting the rectangle. When I printed out the vinyl the little feet were so small I was afraid to use the etching cream on them, so I scrapped the feet.  I used scrap vinyl that was left over from other projects, which is why you see pink and black being used. Here is the frame to start (btw all glass frames are hard to find!).


When using the etching cream you are using the vinyl as a stencil, so you weed out the letters you would normally keep in another project.


After placing the vinyl on the frame I used paint brush to place the etching cream over the glass. I thoroughly coated the frame and left it alone for about 20 minutes.


After twenty minutes you peal away the vinyl and wash the cream away, and the frame was complete....but I forgot to take a final picture of it. You will just have to trust me that it turned out great, and I got it on the first try it was so easy!! Much to my husband's disappointment glass etching is not done by inserting the glass under the blade of the silhouette, but applying a cream that etches the glass.

Here are some examples of things that can be done with glass etching and the Silhouette.


The possibilities are endless! I hope you all had a wonderful Father's Day! My dad truly loved his present!

Happy Etching!

Monday, June 11, 2012

Silhouette Designs Successes and Failures

Chris bought me a Silhouette Cameo for my birthday back in May. It is similar to a Cricut, but it does so much more! My motivation for choosing the Silhouette is the fact that you can create your own designs. The night my Silhouette arrived Chris's friend, Mason, was in town from Wyoming. The guys decided to invite more guys over and grill out. While they were having guy time around the grill and in the garage I was able to set up my new toy! I unpacked everything on our dining room table and had two laptops running simultaneously with my Cameo in the middle.

Meet my Cameo....


After I watched the "how to DVD" and set everything up, I decided to make a monogram for my sewing travel case. This design was extremely easy and afterwards I thought I could make anything!


The next design I attempted was our school mascot/logo, and lets just say I jumped from easy to professional level of difficulty by attempting that design. Here is a picture of our logo that I was trying to recreate.


 This project was an EPIC FAIL! I didn't take pictures, and I wasted so much vinyl trying to figure this guy out. I realized quickly that my best bet was to start with a black and white logo. This image had way to many color layers and I could not figure out what needed to be cut and what did not need to be cut. ***The Silhouette Cameo is not a printer, it is a cutting machine, so every line you make is a cut line. After you cut your image you use a hook tool to peal away unwanted pieces and you are left with a one color decal.
In the end I scrapped the school logo project. Maybe I will try it again in the future, but right now our little Squire is not meant to be a vinyl decal.

 For my next project I decided to down grade the difficulty and try my hand at The Florida State University Spear Logo. I love all things FSU and I couldn't wait to unleash the endless Seminole craft possibilities that my Cameo could provide. This is what I was going for with my design...

I should have started out with a one color image, but I didn't learn that lesson well the first time. Once again I failed, but this time I took pictures.

Attempt 1:

I couldn't figure out how to make a cut line that wasn't an outline. So I couldn't get one side to remain garnet and one side to peal away. GRRRRRR! I was so frustrated!


I nearly gave up, but I finally got the hang of the program!!! You can see the original image and my design side by side below. I made a couple of changes, but it still screams SEMINOLE PRIDE to me!


Friday, June 8, 2012

Adventures in Rhinestoning!

Chris and I just booked a late honeymoon on a Disney Cruise and I was inspired to make something festive for the cruise! We are sailing on one of their newest ships called the Disney Fantasy complete with a WATER COASTER!!! Since everything I have made lately has been using vinyl decals, I wanted to try something else. So for my next project I decided to try to make a rhinestone shirt using the Disney logo I created for the "days until" shadow box. I figured it wouldn't be that difficult to transher the logo into a rhinestone template.....man was I wrong, but the good thing about putting hours into making a design is once it's created I can use it over and over again!

The first thing I did was do some research on how to change my design into a rhinestone template. The Maggie Muggin's Blog allowed me to download the rhinestone sizes and gave me a really good tutorial of what I was about to do. The only difference was that my logo was a single cut, so I had to lay each rhinestone shape one at a time over the design I made on the design studio. About 1200 rhinestones had to be copied and pasted to make my Disney Cruise Logo. Basically the Silhouette cuts 1200 tiny holes the size of the rhinestone you want to use and you peal away the decal and place the rhinestone in the empty spots.

This is what it looks like after it has been cut. It is really hard to see, but there are 1200 tiny circles cut into this sheet in the shape of the Disney Cruise Logo.


The next step is to peel off the top layer and place it on another sheet of paper or hard cardboard. It is important not to stretch the vinyl at this stage, because it will distort you decal.

  The circle cut outs that remain can be thrown away.

The next step was to place my rhinestones. This was easy until I bumped the cardboard and had to start all over!!!


Once I had my image created and rhinestones placed I used the transfer paper to pick up the rhinestones and place them on my shirt.


Then I ironed the rhinestones down and my shirt is finished!

I can't wait to set sail!

Krafting Kerry Designs Etsy Store NOW OPEN!

I am so excited to announce that this morning I was finally able to open up an Etsy Store!! Thank you to everyone who has encouraged me to do this, and to those of you who have requested to purchase items that gave me this idea! I will adding lot of items over the next few days, but you can find my store by clicking Krafting Kerry Etsy Store. The most requested item by my Facebook friends of the FSU Spear Decal Only, will be posted ASAP. Below are some pictures of things that are currently listed in the store that I have recently made:

I used the days "days until" decal to make these fun shadow boxes!

I created these fun dress up helmets for my God Son Jack and his brother Bennett. On the back they say "U.S. Army."


Lastly, I created the FSU spear logo using the Silhouette Design Studio. This was my first design to generate on my own! I probably should have started with a much simpler project since I am a newbie to the program, but I dove right in! I worked on and off for about three weeks on the spear and I am so happy with how it turned out. I will post my mess up pictures in another posting. Next to the spear up you will find an acrylic wine glass with the Disney Cruise Logo. This logo was much easier to create! Because of the two colors in the logo I end up making two decals at a time. This one's brother logo can be seen on the days until frame above!


That is all for now, but stay tuned for more items! All decals can be purchased as a decal onlyl! I love love love making new things and I am so blessed to be able to share them with all of you!

Wednesday, June 6, 2012

The Newbie's First Post - Sewing!

Summer has finally arrived! This past school year has been full of craziness, but in the midst of all the ups and downs Chris and I found time to get married!!! In lieu of not having a wedding to plan and prepare for I needed a hobby ASAP! One of my best friends is an avid blogger and she has inspired me to create my own blog! The BF has a super cute blog all about her kiddos and family adventures, but since kids are in absentia the focus of my blog is my new found love for crafting!

A couple of months ago I decided it was time to learn to sew. I don't know if it was a wifey instinct coming to fruition or just a check off the ole bucket list, but after the wedding I decided to purchase a sewing machine! The kids at school learn to sew in their Family and Consumer Science Class and I was confident that if they could do it, so could I. I purchased a Singer Sewing Machine and registered for a sewing class at local store called Sew Tech. My first project is an apron!

I only have the ties and buttons left to add and it will be complete! I have also made a sash from the yellow fabric to go around a black and white maxi dress from left over fabric!

Sewing has opened a flood gate of ideas for potential projects and a love for everything crafty! I can't wait to share more projects!